Corda Enterprise Kubernetes Deployment (Part 1 of 2)
February 25, 2020

TL;DR: You can now easily deploy Corda Enterprise along with Corda firewall in a Kubernetes cluster
Introduction
Deploying a Corda node along with Corda firewall manually can be a complex and time-consuming task. In the last few months I have created a solution to deploy Corda Enterprise with a Corda firewall inside a Kubernetes cluster. The solution can be found in this Github repository and here is the documentation for it. This solution speeds up the deployment process and makes it much easier to understand.
In this two-part article I will start by explaining what complexities can occur when deploying a Corda node into production. Then we will learn how to automate the deployment to avoid these complexities using Docker, Helm and Kubernetes. In part two of this article, we will dive into more technical details by deploying and operating the Corda Kubernetes deployment.
If you are not familiar with Kubernetes deployment, have a look at my previous article on “Setting up a Corda Kubernetes deployment network for developers using Docker”.
Please note that this article focuses on Corda Enterprise and not the open source version. If you do not have access to Corda Enterprise yet, you can download Corda Enterprise Evaluation version here.
Corda Enterprise Deployment Options
Let’s look at the different components you can deploy along with a Corda node and see how complex these different options are.
A single Corda node with H2 database
This is the simplest form of deploying Corda Enterprise. It is comprised of just one single Corda node, which involves copying one “corda.jar” binary file along with one “node.conf” configuration file for defining how to run the application. If using the embedded support for H2 database, the Corda node will automatically generate a file database using H2 on the local file system on startup. This database file will be located next to the “corda.jar” binary file.
This is an easy way of deploying a Corda node, which is suitable for testing and simple development setups. The only real requirement is to read and understand what the “node.conf” file does and the section on “initial-registration”.
This setup is so easy that it has been added as a functionality on R3’s Marketplace, where you can create a node for yourself that connects to Corda Testnet (test network).
External databases
It is important to point out at this point that adding an external database server rather than the embedded H2 database is quite a simple task. All that is required is standing up the external database server, taking the database connection url and assigning that url to the “node.conf” file and making sure that the two servers have the appropriate permissions to connect to each other.
The reason I’m mentioning this is to emphasize that adding an external database is not a hugely complex task. The complexity will remain the same, regardless of whether we are deploying a simple Corda node with H2 database or Corda node deployment along with an external database.
A Corda node with attached Corda firewall
Next, we will add a bit more complexity, let’s see how.
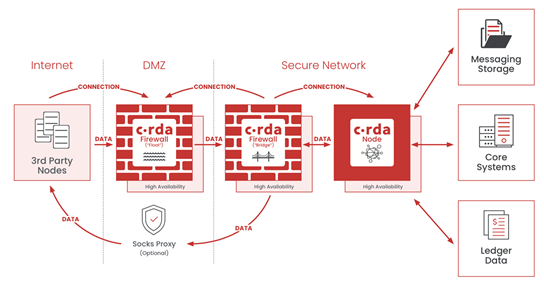
The Corda firewall is R3’s answer to enabling true DMZ (demilitarised zone). For more information on DMZ, see the “Demilitarized Zone” section on the Architecture Overview page.

The Corda firewall is composed of two components, a bridge and a float. The Corda node routes traffic through the Bridge and the float. The bridge handles all outgoing traffic from the node, but also incoming traffic which is routed via the Float component. The outbound traffic can also use proxies.
Once launched, these components will enter a mode where they just want to enable a valid tunnel between each other and the Corda node.
This works out to something like this:
- The Corda node starts up, awaiting a bridge to connect
- Meanwhile the bridge starts up and starts connecting to the Corda node
- Once the bridge has connected to the Corda node, the node will take control of the bridge with a special control message
- Meanwhile the float starts up and starts waiting for a bridge to connect and take control of it
- Once the bridge is under the Node’s control, it will connect to the float and once the float has been controlled, it will open up a listening port for external communication from other nodes on the network
At this point the full tunnel to and from the node is enabled and fully functioning.
As we can see, this type of set up is already getting more complex than the single node case. In addition to the Corda node, we will need two new services, one for the bridge and one for the float. Both of these components come with a “corda-firewall.jar” binary file and a “firewall.conf” configuration file. The configuration files will be different for both bridge and float. This introduces a new level of complexity and it is easy to run into issues when creating this deployment. Some of the issues that can happen easily are misconfiguring the ports that the services need to open and connect to, or not setting up the Corda firewall tunnel PKI correctly.
Corda firewall PKI Hierarchy
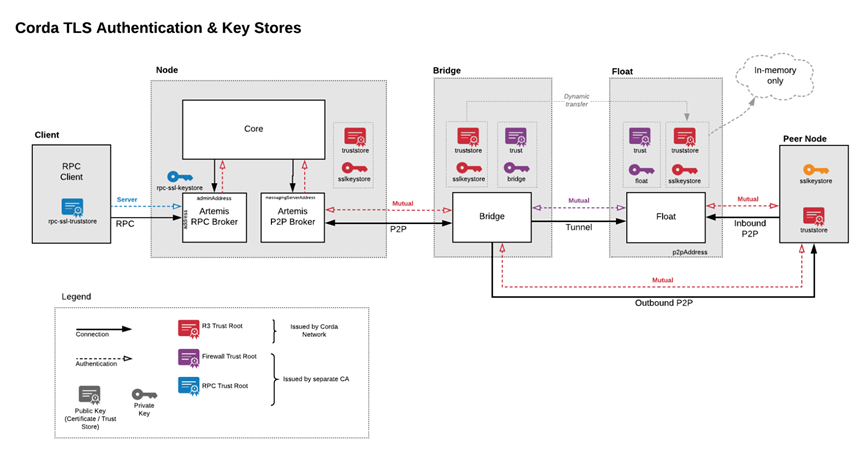
In order to create a secure tunnel to and from the Corda node, the Corda firewall will have to encrypt the communication that it handles. This is done by using Transport Layer Security (TLS) based encryption. All Corda related communication between nodes on the network, whether using Corda firewall or not, is always TLS encrypted. However, the Corda firewall adds a requirement to use a separate TLS root (a separate PKI hierarchy) to ensure that any potential hacking attempts in the DMZ cannot breach the internal zone. This means that we will have to generate this new PKI hierarchy for the Corda firewall to use.

This is not a massively complex task, but it is important to define the hierarchy correctly to avoid creating any security gaps in the system. It is imperative that the Corda firewall certificate trust root does not lead up to the Corda Network certificate trust root, they must be different to secure the DMZ from the internal zone.
Introducing: Corda Enterprise Kubernetes deployment
I created the Corda Kubernetes deployment as a solution to the aforementioned complexity and to ease the journey into production deployment of a Corda node.
The solution comes with two resources, a Github repository and a section on the Corda Solutions documentation site. Using these resources we can understand the reasons to use Kubernetes, how Kubernetes fits into the deployment, and how we can deploy and start up a deployment with the best practices around security in place.
Let’s review what we can find in these resources next.
Architecture Overview
It is recommended to start the journey into the Corda Kubernetes deployment by taking a look at the architecture of a Corda Enterprise deployment, which can be seen at the Architecture Overview page.
In this section, we learn about different enterprise components and how they fit together as well as where they should be deployed. We will review Corda firewall components, the bridge and the float. We will look into how the Kubernetes Cluster should have access to a Container Registry for Docker images and how to use external resources such as file storage, databases and optionally Hardware Security Modules (HSM).
Prerequisites
In order to execute the deployment from the repository successfully there are a number of prerequisites to consider, mainly the deployment infrastructure.
To get started with Kubernetes we will need the following:
- Cloud Platform
- Kubernetes Cluster
- Container Registry and Docker Images
- Persistent Storage
Cloud Platform
The Cloud Platform is the infrastructure that underpins the Kubernetes Cluster and Container Registry.
In this article we will focus on Microsoft Azure, but with small adjustments these steps should be possible to translate to any other environment, be it Amazon Web Services (AWS), Google Cloud Platform (GCP) or even a local cluster.
Kubernetes Cluster
It goes without saying that a Kubernetes deployment requires as a prerequisite a Kubernetes Cluster to deploy into. If you haven’t heard of Kubernetes before, don’t worry, here is a brief explanation next:
A Kubernetes Cluster can be explained as a virtual cloud which is created by assigning a number of Virtual Machines (VM) to host any services within this cloud. The cloud can then deploy multiple Docker Containers, to launch different services. For example we could have a Web front-end service, connected to a Web back-end service and so forth. In the context of Corda, the services we would normally see running within the Kubernetes Cluster would be the Corda node and the Corda firewall.
Container Registry and Docker Images
In addition to the Kubernetes Cluster, there is also a need for a Container Registry that the Kubernetes Cluster must have access to, in order to pull down Docker images from.
Docker images are the building blocks of Kubernetes. We can think of a Docker image as a representation of a server at a point in time. It can define which operating system will be running, what software will be included as well as what security practices will be employed to lock down the server.
Each service in a Kubernetes Cluster specifies which Docker image it will be using. All of these Docker images will be hosted in the Container Registry.
It is worth noting that the Kubernetes Cluster needs access to the Container Registry, and this access is set up by use of Service Principals in the context of Azure.
Persistent Storage
Kubernetes pods are usually considered stateless, without any persisted data. In Corda Enterprise, there are some information that should be persisted throughout the Corda nodes existence. We can store data logs that the node produces while running, containing details on transactions and other events that the Node has taken part of. In addition the Artemis Messaging Queue (MQ) which contains incoming and outgoing messages between nodes on the Corda Network should be persisted. If using the H2 database, it would be persisted to this persistent storage as well.
In this deployment we have used Azure File Storage to provide persistent storage for all the components of the deployment.
You can find more information on the prerequisites and how to set everything up under the Prerequisites page.
Helm
Helm is used in this deployment to abstract the Kubernetes deployment files from the values that provide customisation around those files. With Helm we can also enable/disable options of the deployment. For example, we can choose to deploy Corda firewall or not.
Helm works like this, we take a set of template files, that have variables defined in them, then we apply the values from “values.yaml” (a Helm specific file) to the templates and replace the variables with the actual values. This makes it very easy to configure one Corda node deployment, but also if needed, to deploy multiple nodes in a streamlined fashion.
The idea is that we only need to customise the configuration in the “values.yaml” file and then execute “helm_compile.sh” to compile and deploy the templates as a Kubernetes deployment directly to the Kubernetes Cluster. This acts as a single “deploy”-button.
Please find the Helm charts in the Github repository helm section.
Before we execute this deploy script, we need to perform the initial registration.
Initial registration
An initial registration is the act of creating a valid identity for the Corda node to communicate with other nodes on a Corda Network. Each identity is defined by two parts, the TLS certificate and the Signing certificate. In order to set up this identity, the node will have to submit a valid Certificate Signing Request (CSR) with a valid X.500 distinguished name to the Identity Manager on the Corda Network. The process is described in detail here.
TLS Certificate
The TLS certificate is used to encrypt communication between nodes on the network using Transport Layer Security (TLS). It is worth noting that all communication on any Corda Network is always mutually encrypted with TLS.
Signing Certificate (Legal Identity Key)
The Signing certificate is what makes a node unique on the network. With this unique certificate, the Corda node will sign for any transaction originating from this node, which ensures that recipients will be able to validate that they are transacting with the correct entity on the network. The certificate should be stored in a secure manner and never handed over to third parties. The usage of a Hardware Security Module (HSM) is recommended to keep the private key material of the certificate secure.
Hardware Security Module (HSM)
A Hardware Security Module is a dedicated secured computer that stores private key material in a safe manner. The HSM is tamper proof using custom hardware and guarantees that no one can access your private keys without your permission. Corda and Corda firewall can integrate with HSMs.
Initial registration steps
Having established that the Corda node needs to generate valid certificates using a CSR, we can now dive deeper into how this should play out in any deployment.
Since any Corda node requires the TLS and Signing certificates in order to communicate and validate transactions, we will always need to have them available to any deployment. That means that the initial registration should be considered as a pre-step to deployment.
There is a specific folder for handling the initial registration pre-step in the repository, in the Github repository under Helm/initial-registration.
By executing “initial_registration.sh”, we can compile and execute a script that will handle the initial registration in its entirety. What this script does is, create a CSR using the X.500 name specified in the “values.yaml” file, send this CSR to the Identity Manager of the Corda Network and once approved, generate the necessary certificates (TLS & Signing) and finally download the network-parameters file which is required if deploying a Corda Firewall.
One-time setup
We have now identified the necessary steps that need to be performed in order to deploy a Corda node in a Kubernetes Cluster, namely:
- Build Docker images
- Push the Docker images to the Container Registry
- Generate Corda firewall PKI (certificate hierarchy)
- Corda node initial registration
The Corda Enterprise Kubernetes Deployment has a “one-time-setup.sh” script that will perform all of the above steps. This script complements the “helm/helm_compile.sh” script so that you can execute the “one-time-setup.sh” script just once, and then deploy and customise your deployment again. You can re-deploy using “helm_compile.sh” as many times as needed using the information generated in the one-time setup.
Summary
In this article I explained what complexities can occur in a Corda Enterprise deployment. Then we learned how to automate the deployment to avoid these complexities using Docker, Helm and Kubernetes with the new Corda Kubernetes Deployment solution. Join me in the next part of this article series to learn how to use the deployment to its full potential.
Corda Enterprise Kubernetes Deployment (Part 1 of 2) was originally published in Corda on Medium, where people are continuing the conversation by highlighting and responding to this story.
